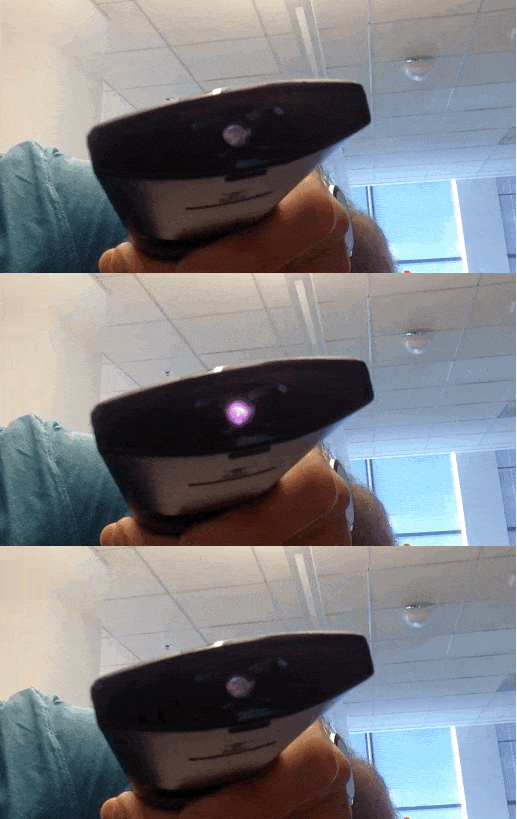
We got a few TVs installed in the office, and my boss wasn’t sure if one of the remotes was working. Showed him this simple trick, and it blew his mind!
- What would you do if your remote control stopped working?
- Most of you would simply bang it a few times and try using it again.
- Poor thing! I feel sad for it. Instead, why don’t you try a simple trick mentioned below to find out what’s wrong with the remote?
Check If Your Remote Control Is Working!
The Camera Method
Most remote controls use infrared light to transmit the signal. While the human eye cannot see this light, a camera can easily spot it.
So, using a phone or digital camera, here’s a simple way to tell whether your remote is transmitting signals or not.
1. Turn your phone or digital camera on.
2. Point the remote control at the camera and press any button on the remote.
3. If you see a bluish light come from the remote when viewed through your phone or digicam display, then the remote seems to be working fine.
4. Now, if you don’t see a flickering light, or if it is dim, then it’s time to replace the batteries in the remote control with the new ones.
NOTE:
- On some of the latest iPhones and Android phones, you’ll have to use the front camera to do this test. Most of the rear-side cameras have IR filters that don’t sense the infrared rays anymore.
- This trick only works with infrared remotes.
Other Methods
And If Replacing By New Batteries Doesn’t Work…
1. Basic Check
- Clean the upper edge of the remote control where the Infrared Eye or the IR sensor is present.
- Open the battery compartment on the back of the remote and check if the batteries are properly placed in their respective terminals.
If that doesn’t work,
2. Electronic Glitch Check I
- Open the battery compartment on the back of the remote and remove the batteries.
- Press and hold any button on the remote for 30 seconds.
- Release the button and reinsert the batteries properly.
- If the remote works, there was a glitch in the remote that was cleared when you discharged the remote in the prior step.
If that doesn’t work,
3. Electronic Glitch Check II
- Open the battery compartment on the back of the remote and remove the batteries.
- Press every button on the remote twice.
- Do make sure not to miss any button!
- Reinsert the batteries back.
- This will reset most of the remotes.
If that doesn’t work,
4. Electronic Glitch Check III
- Open the battery compartment on the back of the remote and remove the batteries.
- Press and hold each button on the remote for approximately 5 seconds. (Or you can count numbers up to 10)
- You will have to press every single button on the remote for 5 seconds, don’t skip any for that matter!
- Reinsert the batteries properly.
- This should reset the remote.
If that doesn’t work,
5. Dry Joints Check
- Remotes, when often dropped on the floor, may develop dry joints on the battery contacts or circuit board.
- Open the remote control. (Remove the screws if any. Often there are no screws at all but just plastic catches.)
- Inspect the contacts on the circuit board and solder all suspicious joints.
- This step will rectify 90% of the remotes and make them work again.
NOTE: If you don’t want to take a chance with the circuits, visit your nearest electrician and ask him to solder the dry joints for you. He should charge you a minimum for this.
Even if that doesn’t work, sadly, it’s time to buy a new remote!
Next time your remote is acting a bit funny, just take out your phone or digital camera and use this trick. Your laptop’s built-in webcam can be used as well.
This trick may also help you detect infrared cameras present in a location (especially in the changing rooms).
And yeah, please, stop banging the remote. It has done no harm to you.
Author: Nik is an experienced author with 14 years in software and tech, holding an IT Engineering degree and a Data Science Master's from Liverpool University.
Disclaimer: This website's content is created by humans and refined by AI for better grammar, flow, and clarity.

